brussels stool
- Mar 16
- 6 min read
Updated: Mar 16
How does a pair of antique lace cuffs inspire a modern stool?

It began with a pair of bobbin and needle lace cuffs seen at the Metropolitan Museum of Art. I was drawn to the complex patterns and the fact it was all made by hand. Its hard to imagine the countless hours the lace makers put into making each square inch of these extravagant cuffs.

This lead me to research more about bobbin and needle lace, the two main categories of lace making until the advent of lace making machines in the 19th century. Bobbin lace involves many bobbins of thread that are twisted and crossed over repeatedly while the threads are pinned to a pillow or foam to create a pattern, whereas needle lace is made with a blunt needle and thread, the needle weaving through the thread to make loops that intertwine and create the patterns that way.
I did some initial needle lace tests with cotton yarn to practice lacemaking at a lace scale. The first test was the cobweb stitch in a square, and the second was a double brussels stitch in a triangle. Each test is approximately 2 inches wide.


I decided to go with either the brussels stitch or the double brussels stitch going forward because they are fairly simple and seemed easier to scale up and use thicker yarns or ropes, since my next tests was going to be playing with scale.

Needle lace requires a frame to work the stitches on. On a small lace scale, this is achieved with a thicker thread couched on a piece of muslin stretched on an embroidery frame. This seemed difficult to scale to the size of rope, so I created some simple wooden frames to test the use of 3/16th inch rope to create a lace pattern.

One of my tests has the lace connecting to just three sides of the frame, and I realized that one could sit and use the lace as a seat. I thought about other potential uses like a fruit bowl or a shelving system with elastic shelves, but the seat won out.


Ok, a seat is possible, but how should the frame be made? How should the rope connect to the frame? Metal of some sort was the choice over wood, since wood would have to be bulkier to hold the weight of a person, and the metal could be thinner and detract less from the rope. I started to test this with a pre-made bent tube chair base with different rope thicknesses: 1/4 inch cotton rope, 3/8th inch polypropylene rope, and 1/2 inch polypropylene rope, respectively.


[double brussels for the 1/4 inch rope, single brussels for the 3/8th inch and 1/2 inch rope]


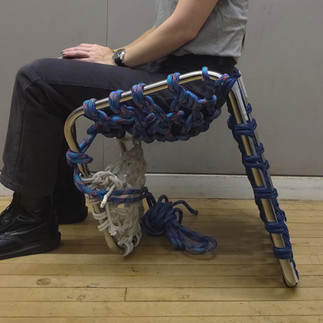
[testing the feeling of sitting]
3/8 inch rope was the best compromise between sturdiness and comfort, so that was the rope thickness I went with. This was ideal because there is a greater variety of colors and styles available in 3/8 inch rope compared to other thicknesses.
I noticed that sitting on the rope stretched the seat and made it so the bottom of the seat was around 3 inches lower than the top of the frame, so I had to account for that in my final frame height so the seat is not too low when sat on.
I thought about adding little loops to a metal frame vs. drilling holes vs. looping the rope as is on the metal frame. Welded loops seemed potentially fragile, and it would be difficult to drill large enough holes in the tube to fit the rope, so I went with the last option. It was the simplest and likely most structurally sound method, and the rope loops around the frame adds its own look.
I started making 1:8 scale models using kite string that matched the 3/8th inch rope, and 3/32nd inch thick aluminum tube to match 3/4 inch steel tube. That was the tube thickness I decided to use because the smallest radius of bending 3/4 inch tube was 2 inches, but the smallest radius for 1 inch tube was 4 inches with the tools I had available to me. I wanted the radius of the bends to be smaller than 4 inches, so 3/4 inch tube it is. I measured out a proportionate amount of kite string that was equivalent to 100 feet of 3/8 inch rope to see if that would be enough rope, since most 3/8 inch rope comes in 50 or 100 feet hanks. Its possible to get longer ropes, but it tends to be more expensive. Thankfully, it seemed 100 feet would be just enough.


Initially I thought an open loop for the frame would be the easiest to fabricate since there is only one weld seam (the steel tubes I had access to were 8 feet in length, one would not be long enough). But I looked at other examples of cantilever chairs made of bent tube, and almost all of them had a closed loop. The only exceptions had a crossbar welded somewhere to take the sideways force, and I didn't want a crossbar distracting from the elegant curves. I went with a more standard cantilever design, the third one in the gallery above.
I added slight angles by making the front of the stool wider than the back, and the bottom back is slightly narrower and goes further out than the top back. This made it more tedious to bend than having all 90 degree angle bends, but I think it creates a sleeker, considered look.
I drew out 1:1 scale orthographic drawings to reference while bending the tube.


Now time to bend the tube! I used a Di-Acro manual bender to bend the tubes. This took a quite a bit of brain power to figure out which order to bend which bend, and to keep in mind the slight angles I put into the design so that everything would line up in the end. I bent the frame in two pieces, with two weld seams at the middle back. I took some wire and repeatedly bent it in the order I needed to help me remember the correct order.


I did end up accidentally bending two left sides, but that was alright with me because the first left side didn't have the best angles, so I cut it up and used it to practice welding.

I welded the two seams and grinded down the welds to a smooth finish. I sanded the entire frame to a satin finish, and then applied wax to protect the mild steel from the atmosphere, A sturdier finish would have been ideal, but I did not want to work with high VOC materials.

Now the rope. I found the middle of the 100 foot hank of rope, and created a simple knot and started weaving the brussels stitch seat. The rope was doubled so I could start with a simple loop at the top left, and I went across the top; going back and forth until I reached the front of the seat. The entire process took around 45 minutes. I then wove the remaining couple feet into the front of the seat and hid the ends in some of the knots, sealing the cut ends with a lighter. I sewed the ends to secure them with a strong orange thread to match the rope. Now it is done and can be sat on.
I found it quite comfortable, and so did the other seat testers. If I were to make it at scale, I would use stainless steel 1 inch tube since it is sturdier and can hold more weight. As it is, it wobbled a bit while sitting and larger people did not feel as comfortable putting their entire weight on it. Stainless steel would also be corrosion resistant and thus suitable for outdoor use as well. I 3d printed some feet for the bottom part of the cantilever, but they slid off of the bottom easily. Future chairs I would drill holes to place feet on the bottom securely.

You can see more finished photos of the brussels stool here.


Comments